Opening a Door (Button)
This guide demonstrates how to use gameplay events in the Gameplay Messaging System to trigger opening and closing a door in your Unreal Engine project using a button interaction. We'll create gameplay tags, define a data payload struct, set up event listeners in the Door Actor, and configure a Button Actor to broadcast messages that control the door's behavior.
Prerequisites
- Unreal Engine Project: Ensure you have a project with the Gameplay Messaging System plugin installed and enabled (see Installing the Plugin).
- Door Actor: A Door Actor with a static mesh component that can be moved or animated to represent open and closed states.
- Button Actor: An Actor (e.g., a button or interactable object) with a mechanism to trigger events, such as a key press or interaction component.
- Basic Blueprint Knowledge: Familiarity with Unreal Engine Blueprints, including creating structs, gameplay tags, and event-driven logic.
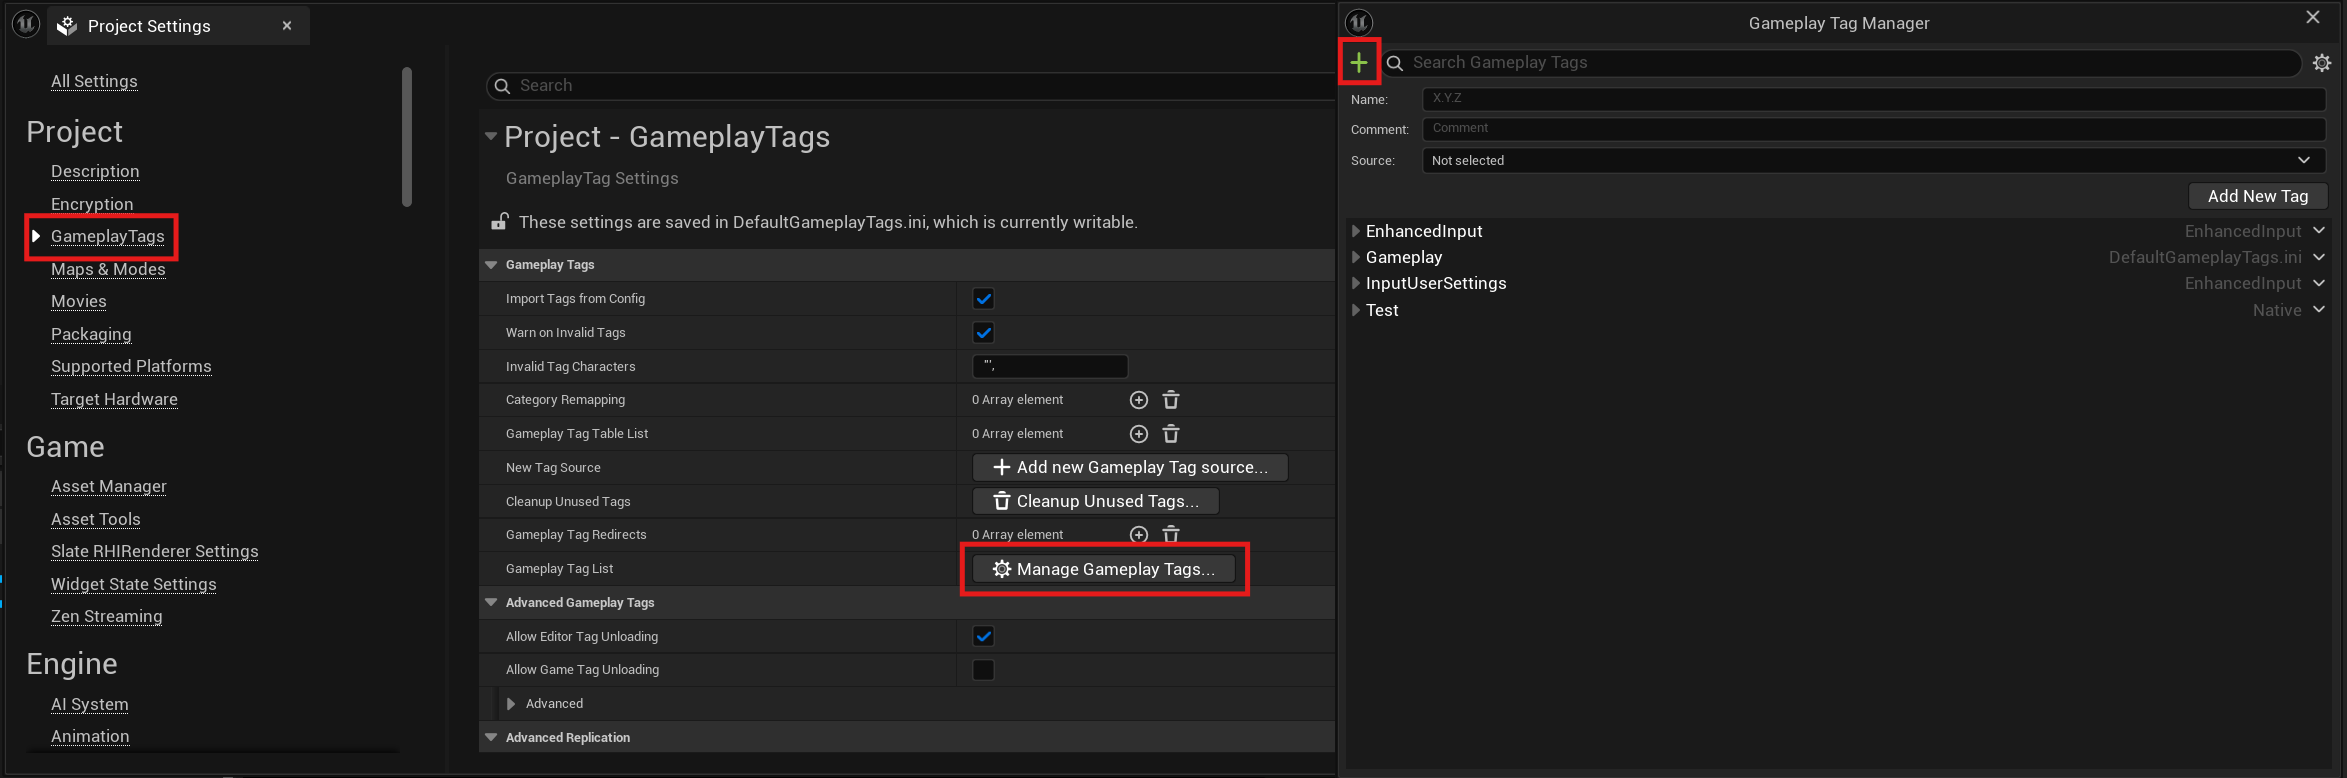
Step 1: Create Gameplay Tags
Gameplay tags are used to identify and trigger specific events in the Gameplay Messaging System. We'll create a tag for the door trigger event.
-
Navigate to Gameplay Tags Settings:
- Open Project Settings from the Unreal Editor's top menu.
- Go to GameplayTags under the Game category.
-
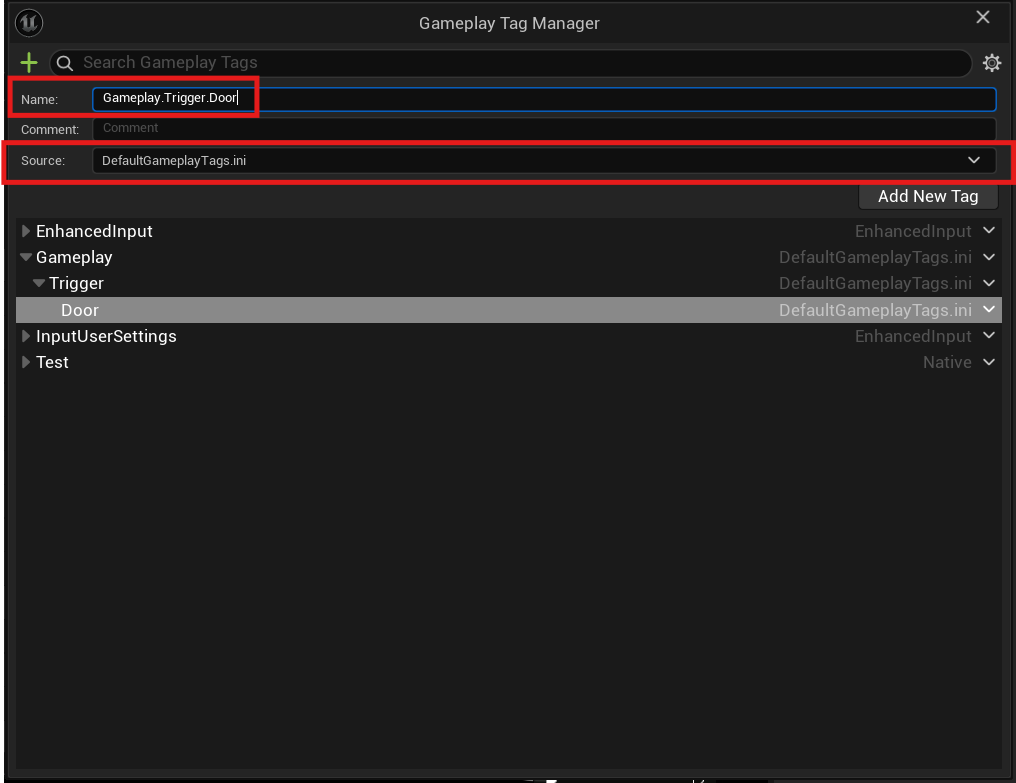
Add a New Tag:
- Click Add New Tag or the + button in the Gameplay Tags section.
- Create a new tag named
Gameplay.Trigger.Door. - Tip: Use descriptive names to keep tags organized, especially in projects with multiple tags.
-
Save Changes:
- Ensure the tag is saved in the Gameplay Tags list. This tag will serve as the channel for triggering door events.
Step 2: Create a Payload Struct
To send data with the gameplay event (e.g., whether the door should open or close), we'll create a struct to act as the payload.
-
Create a New Struct:
- In the Content Browser, right-click and select Blueprint > Structure to create a new struct.
- Name it descriptively, such as
DoorStatePayload.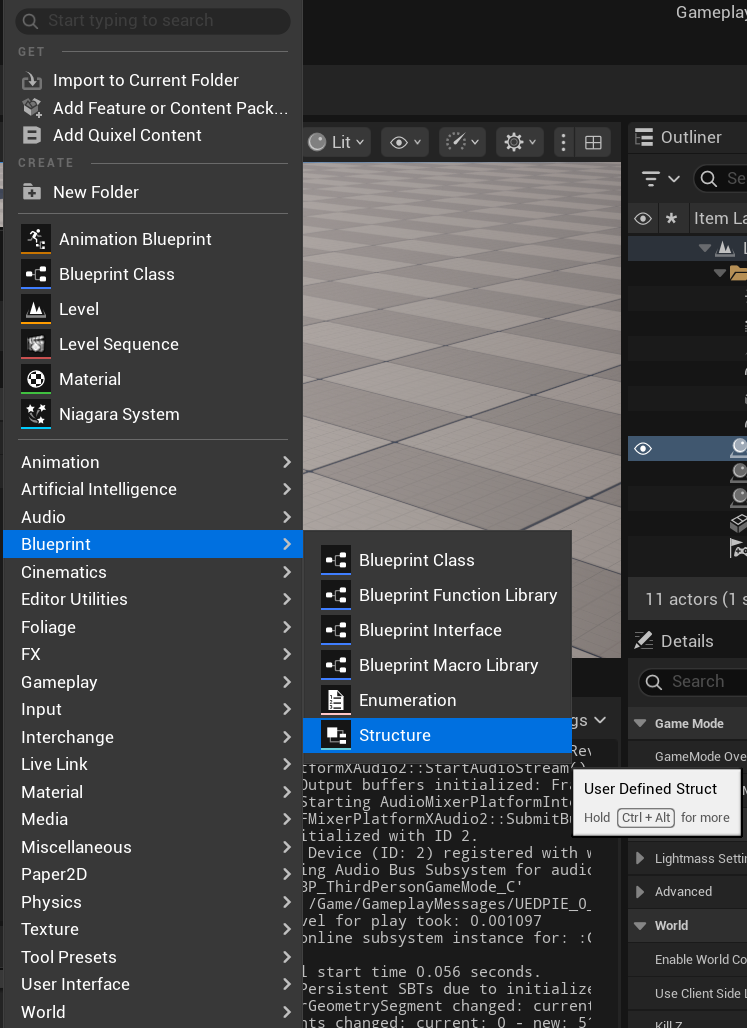
-
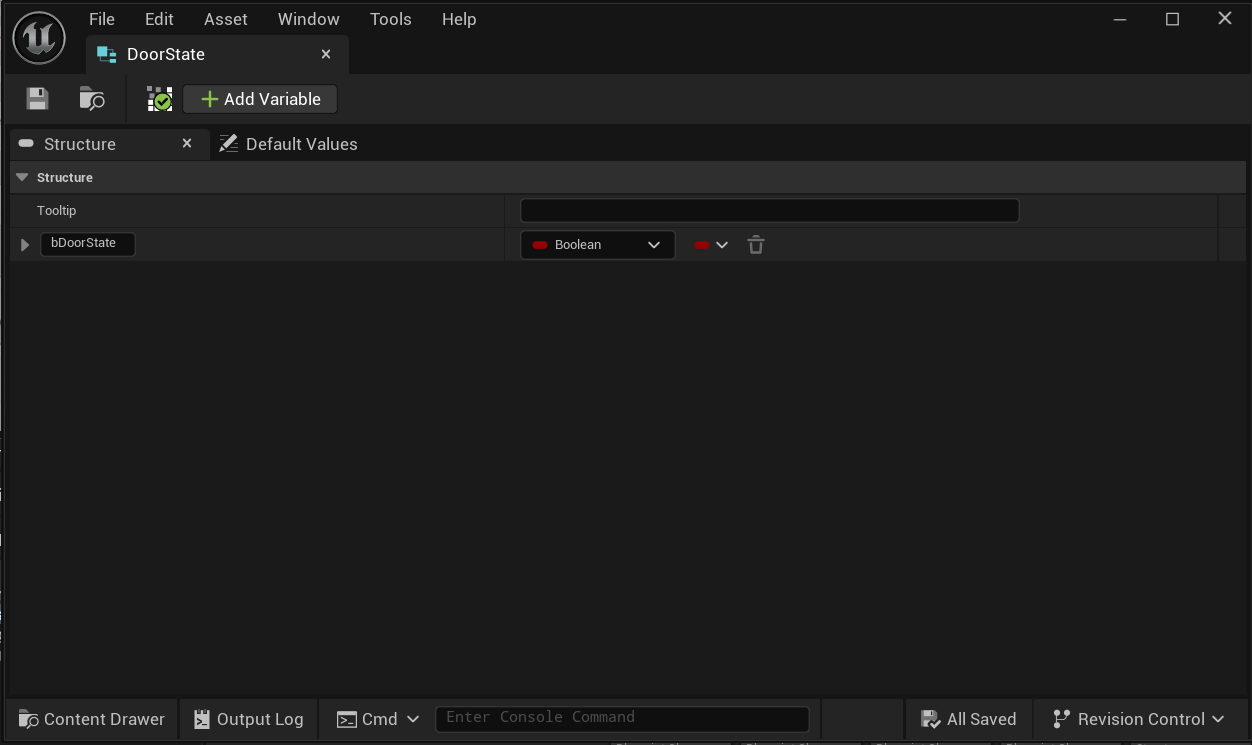
Define Struct Variables:
- Open the struct in the Blueprint editor.
- Add a Boolean variable named
IsOpen(or similar) to indicate the door’s state (truefor open,falsefor closed). - Save and compile the struct.
Step 3: Set Up the Door and Button Actors
The Door Actor will listen for gameplay messages, while the Button Actor will broadcast messages to trigger the door’s open/close behavior.
-
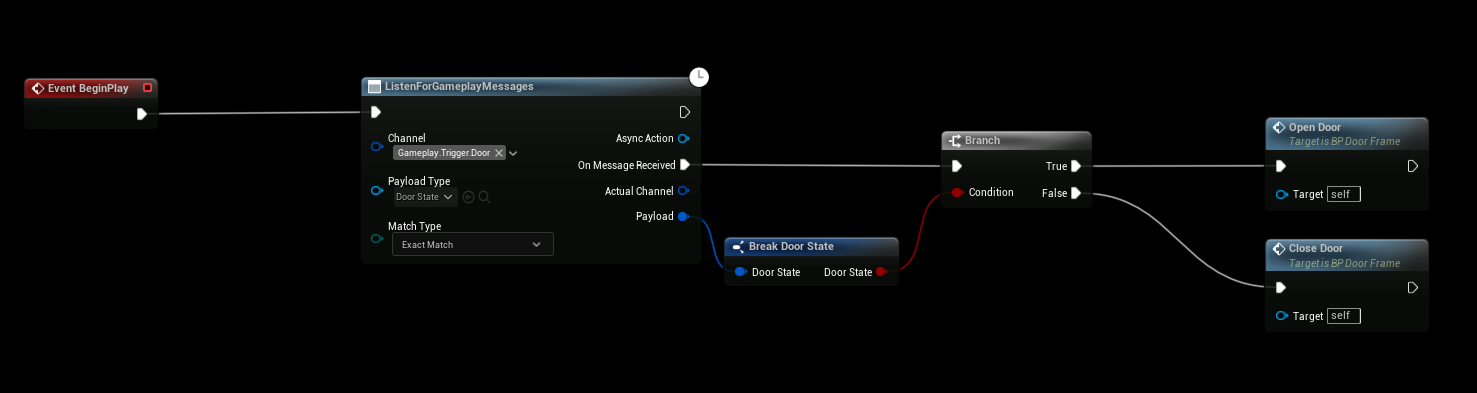
Configure BeginPlay in the Door Actor:
- Open the Door Actor’s Blueprint.
- In the Event BeginPlay node, add a Listen for Gameplay Messages node.
- Set the following parameters:
- Channel: Set to the
Gameplay.Trigger.Doortag created earlier. - Payload Type: Select the
DoorStatePayloadstruct.
- Channel: Set to the
- This node enables the Door Actor to listen for events triggered on the specified tag and process the associated payload.
-
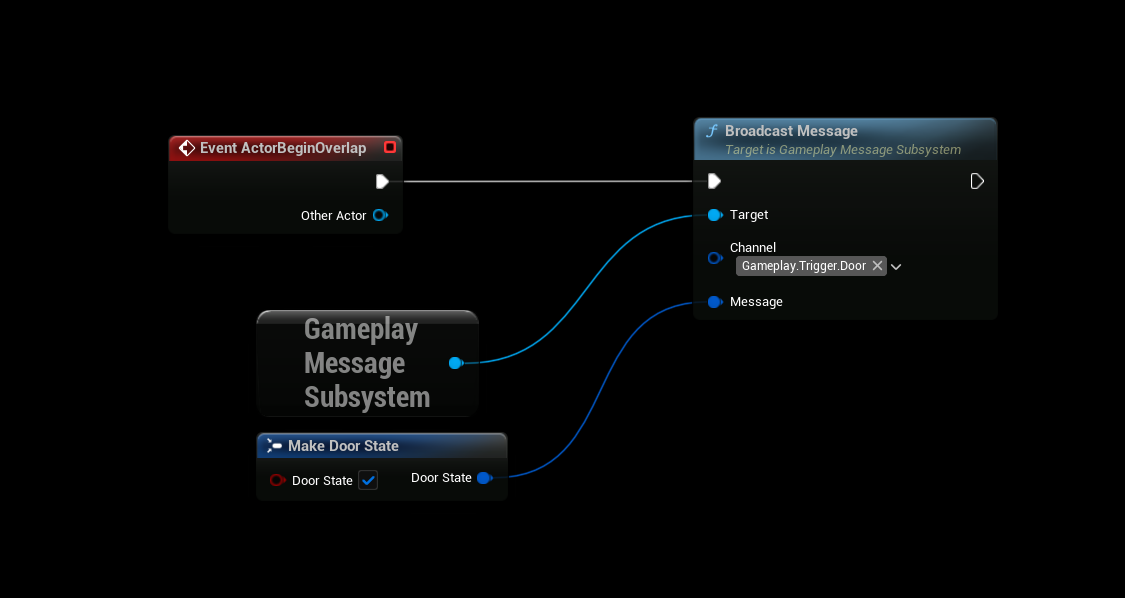
Configure the Button Actor:
- Open the Button Actor’s Blueprint (e.g., a button, lever, or interactable object).
- Add logic to trigger the door event, such as an OnInteract event or a key press (e.g., pressing the "E" key).
- Add a Broadcast Gameplay Message node to send the event.
- Set the following parameters:
- Channel: Set to
Gameplay.Trigger.Door. - Payload: Create a new instance of the
DoorStatePayloadstruct. - Set the
IsOpenvariable totrueto open the door orfalseto close it (you can toggle this based on the current door state or use separate interactions for open/close).
- Channel: Set to
- Example: If the button toggles the door state, use a boolean variable to track the current state and flip it on each interaction.
-
Handle Open/Close Logic in the Door Actor:
- When the Listen for Gameplay Messages node receives a message, it outputs the
DoorStatePayload. - Use the
IsOpenboolean from the payload to determine the door’s behavior:- If
IsOpenistrue, move or animate the door’s static mesh to the open position. - If
IsOpenisfalse, move or animate the door’s static mesh to the closed position.
- If
- Example: Use a Set Relative Location or Add Relative Rotation node to adjust the door’s static mesh component.
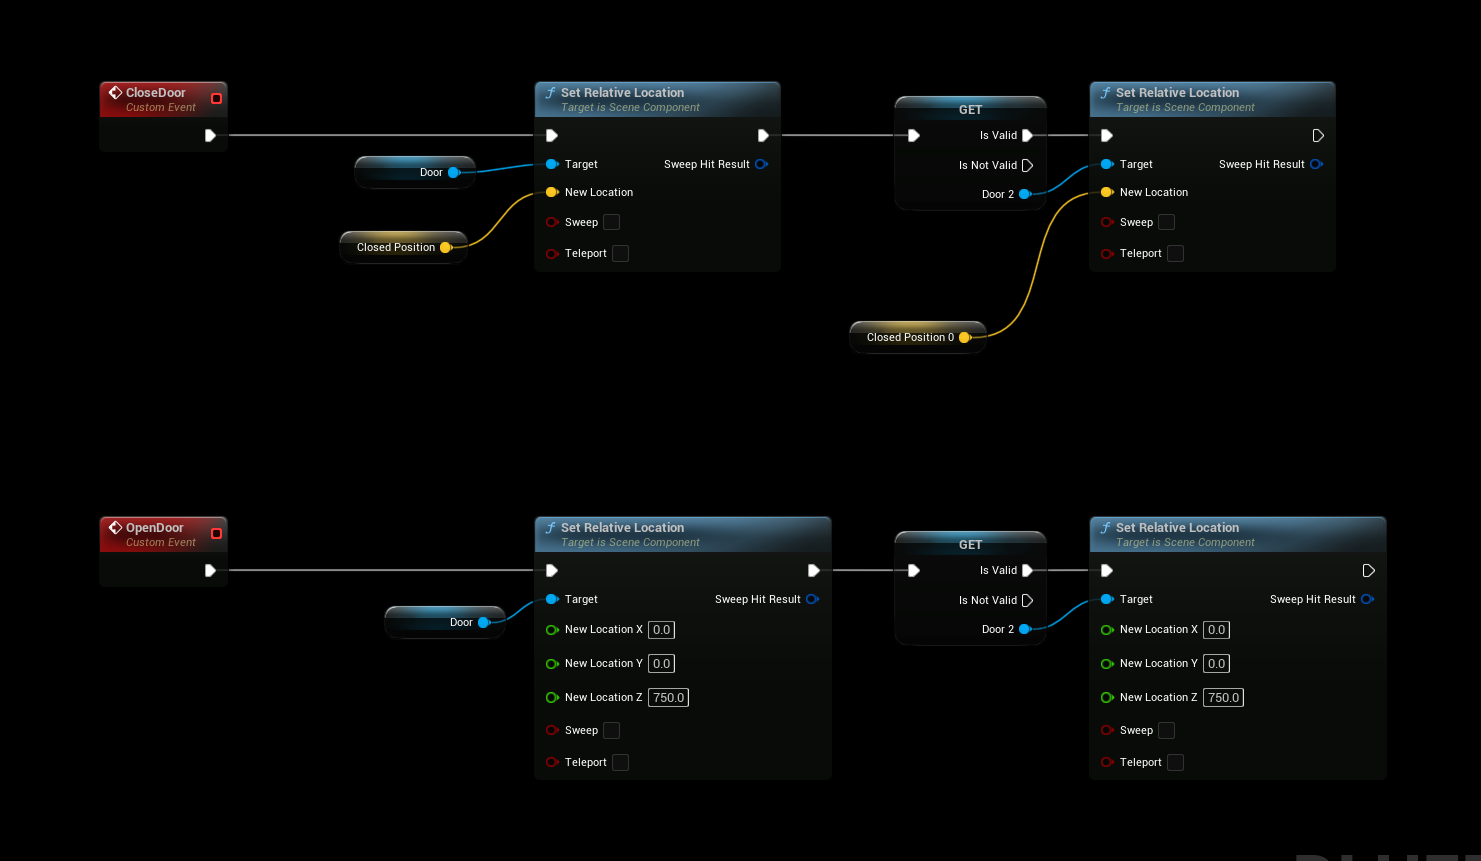
- When the Listen for Gameplay Messages node receives a message, it outputs the
Step 4: Test the Setup
-
Place Actors in the Level:
- Add the Door Actor and Button Actor to your level.
- Ensure the Button Actor is interactable (e.g., has a collision component or interaction system) and is positioned where the player can access it.
-
Playtest:
- Run the game in the Unreal Editor.
- Interact with the Button Actor (e.g., press "E" or click the button) to trigger the Broadcast Gameplay Message node.
- Verify that the door opens or closes based on the
IsOpenvalue in the payload.
Results
-
Closed State: The door remains closed when no interaction has occurred or when the button sends a
falsepayload.
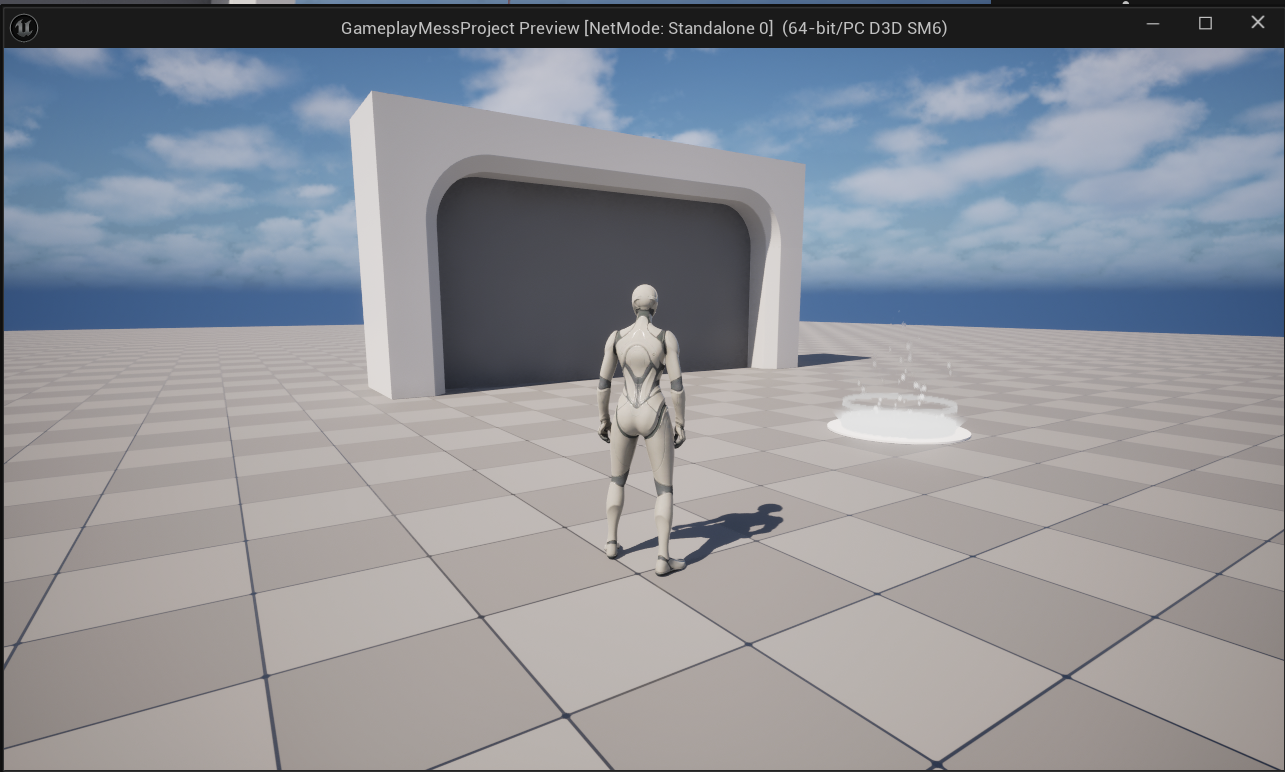
-
Open State: The door opens when the button sends a
truepayload.

Additional Notes
- Button Interaction: Customize the button’s interaction mechanism (e.g., key press, mouse click, or proximity trigger) based on your game’s design.
- Toggle Logic: For a single button that toggles the door state, store the current state in a variable and alternate between
trueandfalsein the Button Actor’s logic. - Customization: Expand the
DoorStatePayloadstruct to include additional data, such as door animation speed, sound effects, or a specific door ID for targeting multiple doors. - Optimization: Ensure the Button Actor’s interaction system is efficient (e.g., use appropriate collision settings or interaction components).
- Debugging: If the door doesn’t respond:
- Verify the
Gameplay.Trigger.Doortag is correctly set in both the Broadcast Gameplay Message and Listen for Gameplay Messages nodes. - Check that the payload struct is properly configured and passed.
- Use Print String nodes to debug the button interaction and payload values.
- Verify the
Next Steps
- Explore advanced features of the Gameplay Messaging System, such as broadcasting to multiple actors or handling networked events.
- Add visual or audio feedback to the button (e.g., a press animation or sound effect) to enhance the player experience.
- Experiment with complex interactions, such as requiring multiple button presses or combining with other triggers (e.g., pressure plates).
- Refer to the plugin’s official documentation on the Unreal Engine Marketplace for additional use cases and configuration options.
For further assistance, consult the plugin’s documentation or contact the plugin developer through Marketplace support channels.